![logo-inverted@1x.png]](https://support.alcatraz.ai/hs-fs/hubfs/logo-inverted@1x.png?height=40&name=logo-inverted@1x.png)
This guide walks you through integrating the Alcatraz Platform with LenelS2 OnGuard via the OnGuard OpenAccess API. Once configured, the Platform syncs cardholders, badges, and access levels from OnGuard, and sends Alcatraz security events to OnGuard Alarm Monitoring.
Access decisions remain with OnGuard. After a successful face authentication, the Rock sends the badge number to the OnGuard access panel as a card reader would; the integration synchronizes cardholders, badges, and reader assignments between OnGuard and the Alcatraz Platform.
NOTE: Software-based ACS Integrations are a licensed feature from Alcatraz and are not required for a functioning Alcatraz system. Contact Alcatraz Sales for more information.
1. Requirements
|
Alcatraz Platform Software / Cortex |
v3.6.6 or newer (On-prem or Cloud*) |
|
OnGuard |
8.2, 8.3 and 8.4 |
|
OnGuard License |
IPC-096-ALTRZ01-B – the Alcatraz partner integration license, listed under Partner Integrations in OnGuard License Administration. OpenAccess must also be licensed on the OnGuard system (OpenAccess Application Support). Both are ordered through your LenelS2 Value Added Reseller. |
|
OnGuard Services |
The following services must be running on the OnGuard server hosting OpenAccess: LS OpenAccess (REST API), LS Web Service (HTTPS front end, port 8080), LS Message Broker, LS Event Context Provider and LS Web Event Bridge (event delivery to the Platform), and LS Communication Server. LS Linkage Server is also required when Send Security Events is enabled. |
|
Network Ports |
TCP 8080 (HTTPS) – outbound from the Alcatraz Platform or Proxy Service to the server running LS OpenAccess. 8080 is the OpenAccess default; use your OpenAccess port if it differs. TCP 3033 – outbound from the Alcatraz Proxy Service to the Alcatraz Cloud (cloud deployments only). |
* Cloud deployments require the Alcatraz Proxy Service (Section 4), which connects to your region's Alcatraz cloud endpoint (US or EU).
2. Configure OnGuard
The following procedure is performed by the OnGuard administrator. It verifies licensing, confirms that OpenAccess is reachable, enables software events (required for real-time synchronization), creates the OnGuard user and, if Send Security Events will be used, the Logical Source, and records the card format values required in Section 3.2.
2.1. Verify the licenses
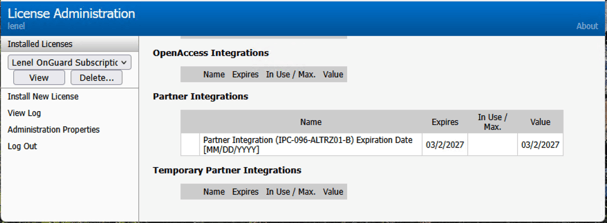
- On the OnGuard server, open License Administration.
- Confirm that OpenAccess is licensed (OpenAccess Application Support).
- Confirm that the Alcatraz partner integration IPC-096-ALTRZ01-B appears under Partner Integrations.
2.2. Confirm OpenAccess is running
- On the OnGuard server, open Services (services.msc) and confirm the services listed under Requirements show Running.
- From a browser on the Alcatraz Platform server (or on the server that will host the Alcatraz Proxy Service), open:
https://<onguard-host>:8080/api/openaccess/version?version=1.0
A JSON response containing product_name and product_version (e.g., OnGuard 8.4 Enterprise) means OpenAccess is reachable. A certificate warning is normal with the default self-signed OnGuard certificate. - If the browser returns nothing, or HTTP 400 Bad Request, restart the LS OpenAccess service and retry.
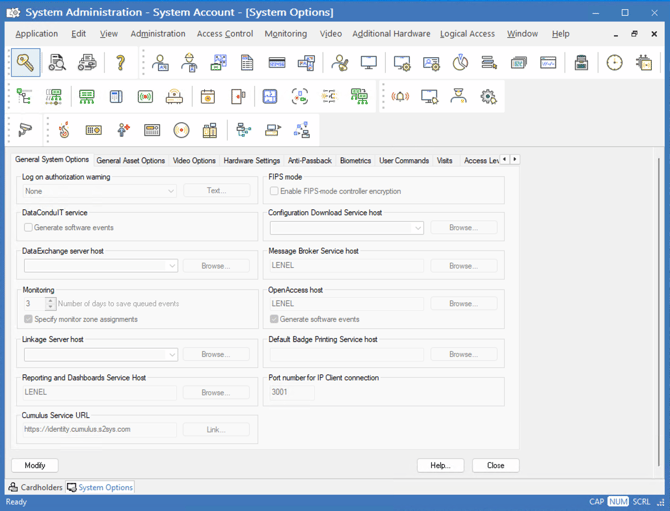
NOTE: In System Administration → Administration → System Options, the OpenAccess Host and Message Broker host names must match the host name in the OnGuard certificate exactly; otherwise the connection fails with TLS (certificate) errors. Use that same host name in the Host URL in Section 3.3.
2.3. Enable software events (required for real-time synchronization)
OpenAccess software events deliver OnGuard changes (new or modified badges, badge status, access level assignments) to the Platform in real time. If software events are disabled, changes are applied only at the next full synchronization.
- In System Administration, go to Administration → System Options → General System Options.
- Confirm OpenAccess Host is set to the server running the LS OpenAccess service.
- Check Generate software events.
- Set Linkage Server host to the server running the LS Linkage Server service (required when Send Security Events is enabled).
- Click OK. If you changed any host setting, restart the LS OpenAccess and LS Event Context Provider services.
2.4. Create the OnGuard user
The Platform authenticates to OpenAccess with an OnGuard user account. Create a dedicated internal account (e.g., alcatraz) for the integration rather than reusing an administrator account. The integration has been validated with the SA Delegate permission set; the built-in SA account also works. Where a narrower permission set is required, the table below lists the permissions used by the integration – confirm it with your OnGuard administrator.
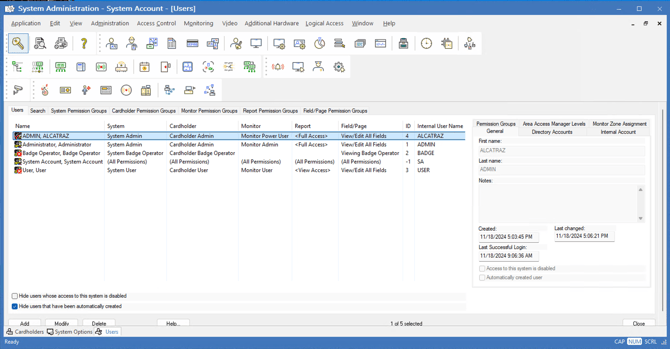
- In System Administration, go to Administration → Users and click Add.
- On the Internal Account tab, select User has an internal account and set the User Name and Password. Note them; they are entered in the Alcatraz Admin Portal in Section 3.3.
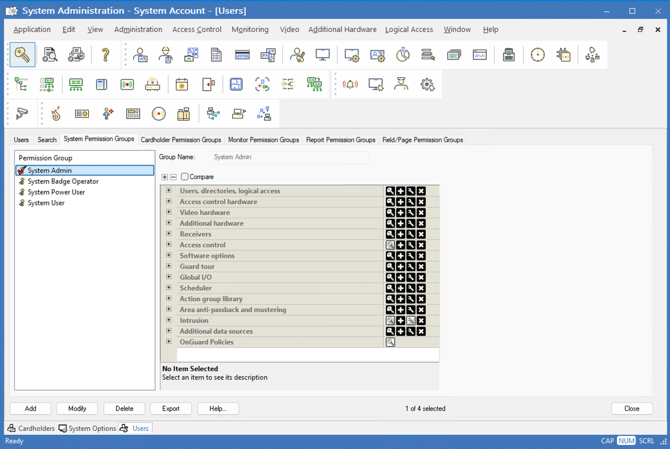
- On the Permission Groups tab, assign permission groups that grant at least the following:
|
Permission group |
Minimum permissions (View unless stated) |
Used for |
|---|---|---|
|
Cardholder Permission Group |
Cardholders - View Badges - View Access Levels (badge assignments) - View |
Syncing cardholders, their badges, and which access levels each badge holds |
|
System Permission Group → Access Control |
Access Levels - View Card Formats - View |
Syncing access level → reader assignments |
|
System Permission Group → Access Control Hardware |
Access Panels - View Readers - View |
Populating the reader list used to map Rocks to OnGuard readers |
|
Segments (only if segmentation is enabled) |
Access to every segment that contains the cardholders, badges, access levels, and readers to be synced |
Data in segments the user cannot see is not synced |
|
Field/Page Permission Group (only if Bio Opt-out rules use a user-defined field) |
View on the user-defined field(s) referenced in the rules |
Bio Opt-out matching (Section 3.4) |
|
System Permission Group → Additional Hardware (only if Send Security Events is used) |
Logical Sources, Logical Devices - View |
Writing Alcatraz events to Alarm Monitoring (Section 2.5) |
Notes:
- OpenAccess enforces the same permissions as the OnGuard desktop applications (e.g., View Reader is required to read readers through the API). All permissions above are read-only; the integration does not modify cardholders or badges.
- Permission changes take effect within about 1 minute (OpenAccess permission cache); permission changes affecting event delivery take up to 15 minutes (Event Context Provider cache).
IMPORTANT - segment access. If OnGuard segmentation is enabled, the user must have access to the segment(s) that contain the cardholders, badges, access levels, and readers to be synchronized. Entities in segments the user cannot access are skipped even when all permissions above are granted. Grant access only to the segments Alcatraz needs – assigning all segments makes the integration load unnecessary entities and can slow synchronization.
2.5. Create the Logical Source for Alcatraz events (optional - Send Security Events only)
Alcatraz security events (e.g., tailgating, spoof attempts, authentication results) are written to OnGuard Alarm Monitoring under a Logical Source. This step is required only when Send Security Events will be enabled.
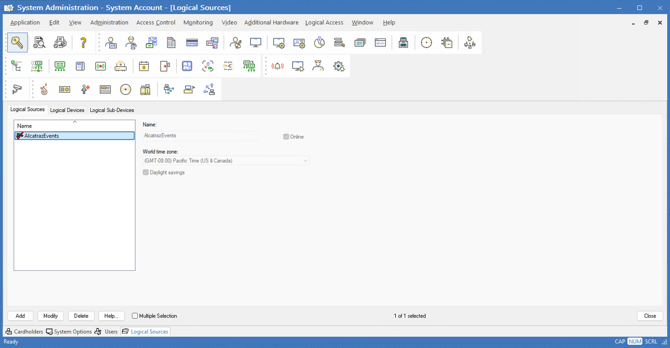
- In System Administration, go to Additional Hardware → Logical Sources.
- Click Add, name the logical source (e.g., AlcatrazEvents), and click OK.
- Note the exact name; it is entered in the Logical Source field in Section 3.3. The Platform does not create logical sources – the logical source must exist in OnGuard before Send Security Events is enabled. Alcatraz events appear in Alarm Monitoring with this name in the Controller column
2.6. Record the card format parameters (required for Card Offset Mapping)
OnGuard stores the facility code and the optional Badge Offset Number on the card format, not on the badge. The badge ID shown in OnGuard is the number encoded on the card plus that offset. The Platform needs both values to match synchronized badges to enrolled profiles (Section 3.2).
- In System Administration, go to Administration → Card Formats.
- For every card format used by badges that will be synchronized, record the format name, Total number of bits on card, Facility Code, and Badge Offset Number (0 if not used).
- Record the range of badge IDs issued under each card format / facility code (e.g., 1–65535, or 1001–1100 if an offset of 1000 is applied to 100 cards).
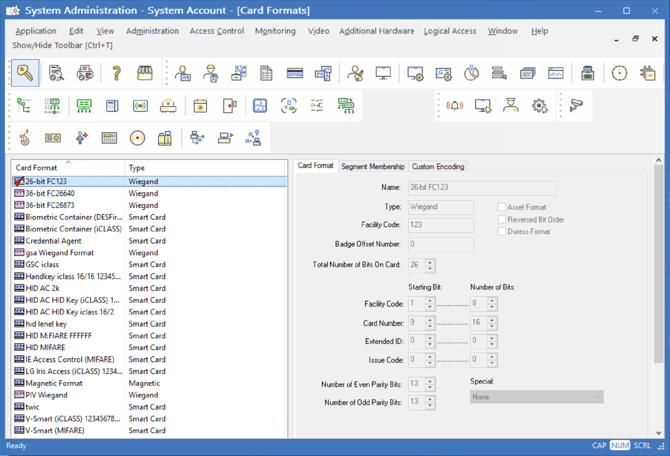
OnGuard System Administration → Card Formats. The Facility Code and Badge Offset Number of the selected format are the values entered in Card Offset Mapping (Section 3.2).
3. Configure the ACS Integration in the Alcatraz Admin Portal
3.1. Before You Start
WARNING: When initially enabled, the ACS Integration will delete profiles that do not have at least one badge that is also present in the ACS. It is recommended that a VM Snapshot is generated and the system is backed up before attempting to configure an ACS Integration.
Card Offset Mapping
IMPORTANT – Card Offset Mapping (facility code, card offset, and badge ID range) must be completed for every card format BEFORE enabling the ACS Integration. OnGuard does not carry the facility code on the badge; without the mapping, synchronized badges cannot be matched to enrolled profiles, which can result in the deletion of profiles or in badges being skipped. See Section 3.2. Add any missing card format first (Adding Card Formats)
Pre-enable checklist
- Take a full system backup (VM snapshot).
- Add every card format in use to the Card Formats section, then complete Card Offset Mapping for each one: facility code, card offset (0 if OnGuard applies no offset), and badge ID range.
- Confirm Generate software events is enabled in OnGuard (Section 2.3).
- Decide which OnGuard reader each Rock will be mapped to.
- Confirm network ports are open (see Requirements).
- Confirm the OnGuard user has only the permissions and segment access it needs.
- Optionally enable Disable Data Deletion for the first synchronization; review the ACS Integration logs before disabling it.
Planned OnGuard maintenance: Disable the ACS Integration in the Alcatraz Admin Portal before performing maintenance, upgrades, or restarts on the OnGuard server, the LS OpenAccess service, or the LS Message Broker service, and re-enable it once OnGuard is fully back online; a full synchronization starts automatically on reconnection. If the integration remains enabled while OnGuard is only partially available, the synchronization may treat the missing data as deleted and remove valid profiles or access.
3.2. Card Offset Mapping (OnGuard-specific)
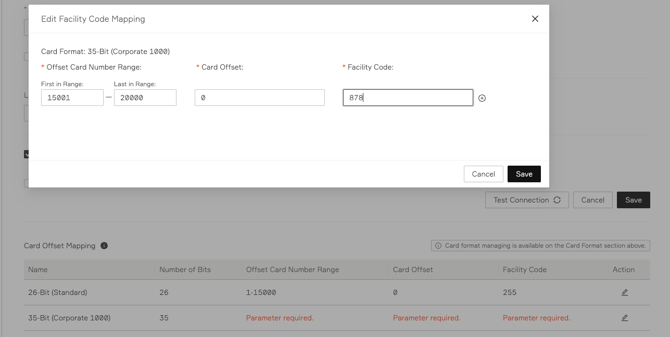
OnGuard reports each badge as a single badge ID (card number + Badge Offset Number); the facility code is defined on the card format. Card Offset Mapping provides both values per card format so the Platform can translate between OnGuard badge IDs and card data:
- OnGuard → Platform (synchronization): the badge ID is matched to the row whose Offset Card Number Range contains it; the Card Offset is subtracted to obtain the card number and the row's Facility Code is applied. The result is matched against enrolled profiles.
- Platform → OnGuard (events): the Card Offset is added back so the badge ID reported to OnGuard matches the value displayed in OnGuard.
If the OnGuard card format has no Badge Offset Number, enter Card Offset 0, the card format's Facility Code, and a range covering all badge IDs of that format (e.g., 1–65535 for 26-bit).
The Card Offset Mapping list is displayed below the ACS Integration settings (card formats are managed in the Card Formats section above). A card format appears once per facility code mapped to it, so a format mapped to several facility codes has several rows. Every row must be completed; missing values are marked Parameter required.
|
Column |
What to enter |
|---|---|
|
Name / Number of Bits |
The card format (read-only, from the Card Formats section). |
|
Offset Card Number Range |
The range of badge IDs as they appear in OnGuard (offset included) that belong to this card format and facility code. Example: 1001–1100 for 100 cards issued under a format with Badge Offset Number 1000. |
|
Card Offset |
The Badge Offset Number configured on the OnGuard card format. Enter 0 if OnGuard applies no offset; the field cannot stay empty. |
|
Facility Code |
The Facility Code configured on the OnGuard card format. |
Example
|
Card format |
OnGuard Facility Code |
OnGuard Badge Offset Number |
Offset Card Number Range (enter) |
Card Offset (enter) |
Facility Code (enter) |
Number encoded on the physical cards |
|---|---|---|---|---|---|---|
|
26-Bit (Standard) |
0 |
0 |
1–100 |
0 |
0 |
1–100 |
|
26-Bit (Standard) |
1 |
1000 |
1001–1100 |
1000 |
1 |
1–100 |
|
32-Bit |
2 |
2000 |
2001–2100 |
2000 |
2 |
1–100 |
Rules
- A facility code can be mapped to only one card format, and each facility code must be unique in the account.
- One card format can be mapped to several facility codes, each in its own, non-overlapping Offset Card Number Range.
- Badges whose OnGuard badge ID falls outside every configured range, or whose card format has no mapping, are not synchronized.
- Only one card format may use facility code 0 per account, and it should not be combined with a Default Facility Code. Contact Alcatraz Support when planning a facility-code-0 deployment.
- The Card Offset must equal the Badge Offset Number of the OnGuard card format. If the values differ, enrollment with those cards is rejected (with Web Enrollment, the profile is created and then deleted at the next synchronization).
3.3. Main Settings
- Log in to the Alcatraz Admin Portal as an Account Administrator and go to Accounts → Account Settings → Account Configuration → ACS Integration (Optional).
- Click Enable ACS Integration and confirm.
- Select OnGuard in the ACS Integration list and fill in the fields described below.
- Complete Card Offset Mapping (Section 3.2).
- Click Test Connection to verify communication with OnGuard. When Use Proxy is checked, Test Connection is disabled; verify the connection via Section 6 instead.
- Click Save. The Account page shows ACS Online within a few minutes and the first full synchronization starts.
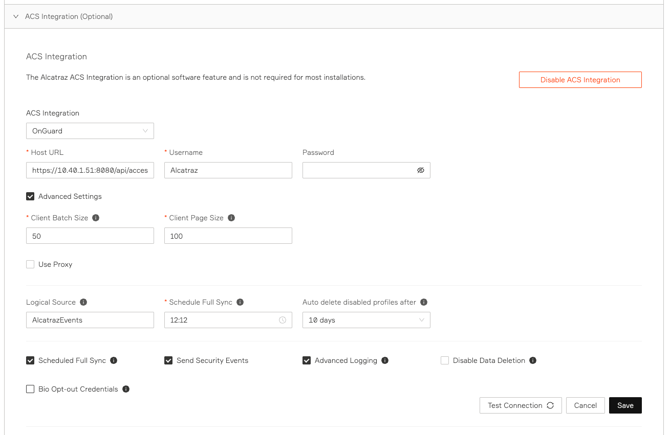
Alcatraz Admin Portal → Accounts → Account Settings → ACS Integration (OnGuard), Platform v3.6.6. Advanced Settings and Send Security Events are checked, displaying Client Batch Size, Client Page Size, and Logical Source.
|
ACS Integration |
OnGuard |
|
Host URL |
OnGuard OpenAccess URL with protocol, host, and port. |
|
Username |
The OnGuard user created in Section 2.4. |
|
Password |
Password for the OnGuard user. |
|
Advanced Settings |
Displays Client Batch Size, Client Page Size, and Use Proxy. |
|
Client Batch Size |
Number of records processed per batch when syncing data from OnGuard (1–50). Use the default unless advised by Alcatraz Support. |
|
Client Page Size |
Number of records fetched per page when reading data from OnGuard (1–100). Use the default unless advised by Alcatraz Support. |
|
Use Proxy |
Enables the Certificate in PEM format download, for use with the Alcatraz Proxy Service (cloud-hosted deployments). |
|
Certificate in PEM format |
Available only when Use Proxy is checked. Click Download to save the PEM certificate, then use it when installing the Alcatraz Proxy Service – see Section 4. |
|
Schedule Full Sync |
Time of day to start a full synchronization with the ACS, in UTC (e.g., 09:00 PDT = 16:00 UTC). |
|
Scheduled Full Sync |
Runs the full synchronization daily at the Schedule Full Sync time (recommended). When unchecked, only incremental synchronization runs, plus the automatic full synchronization after a reconnection or a manual Full Sync. |
|
Auto delete disabled profiles after |
Grace period after which Alcatraz profiles whose OnGuard badges are all inactive (disabled, lost, stolen, or expired) are automatically deleted: Do Not Delete (default), 10, 30, 90 days, or a custom value. Profiles are deleted at midnight. |
|
Send Security Events |
Sends Alcatraz security events to OnGuard Alarm Monitoring. Requires Generate software events and the Linkage Server host (Section 2.3). Displays the Logical Source field when checked. |
|
Logical Source |
Name of an existing OnGuard logical source (Section 2.5), e.g., AlcatrazEvents. Alcatraz events appear in Alarm Monitoring with this name in the Controller column. |
|
Advanced Logging |
Produces more detailed ACS Integration logs, listing exactly which credentials were skipped and why, in addition to the aggregate count. |
|
Disable Data Deletion |
When enabled, Disable Data Deletion prevents the integration from removing or disabling anything in Alcatraz Cortex as a result of OnGuard changes. No biometric profiles, credentials, readers, or access levels are deleted; in addition, a badge set to Lost/Stolen or past its Deactivate date stays enabled, and access-level or reader unassignments are ignored. Additions and updates from OnGuard still apply, and (when Send Security Events is enabled) Alcatraz events are still written to OnGuard. Recommended as a safeguard for the first synchronization and during ACS configuration changes. Exception: Bio Opt-out Credentials rules take precedence (Section 3.4). |
|
Bio Opt-out Credentials |
Enables OnGuard-managed biometric opt-out (Section 3.4). Displays the rule editor when checked; at least one User-defined Variable (field name and value) or User-defined Credential Type (badge type) is required to save. |
Card Offset Mapping: complete the list below the settings as described in Section 3.2 before saving.
Notes:
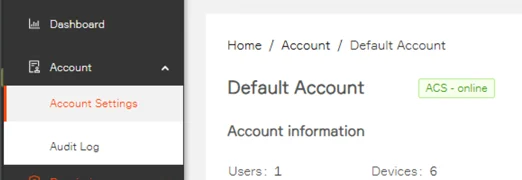
- The integration status (ACS Online / Offline) is shown at the top of the Account page and in the ACS Integration section.
- Disable ACS Integration (top of the section) stops the integration, e.g., before planned OnGuard maintenance (Section 3.1).
3.4. Bio Opt-out Credentials (let OnGuard manage who is opted out)
Bio Opt-out Credentials lets OnGuard manage the Platform's biometric opt-out list. Cardholders who have declined facial authentication, or badges that must never be linked to a biometric profile (e.g., temporary badges), are identified by rules based on an OnGuard user-defined field or on OnGuard badge types. Matching credentials are added to the opt-out list automatically: they continue to function as badge-only credentials, any existing biometric profile is deleted, and new enrollments with them are denied. Requires Platform v3.6.5 or newer.
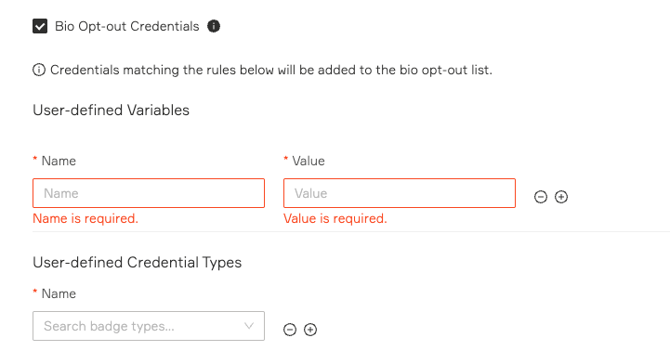
Bio Opt-out Credentials rule editor (Platform v3.6.6). At least one User-defined Variable or User-defined Credential Type is required to save.
User-defined Variables (per cardholder)
Name: the backend name of the OnGuard cardholder user-defined field, not its form label. In FormsDesigner a field has a display label (e.g., EZ Entry Preference) and a backend name (e.g., EZENTRY_PREF); enter the backend name here
Value: the value that identifies an opted-out cardholder (letters, numbers, or both); for list fields, the list item text as displayed in OnGuard. Matching is case-sensitive; leading and trailing spaces are ignored.
- All badges of a matching cardholder, including badges added later, are added to the opt-out list. An existing biometric profile is deleted from the Platform and all Rocks; new enrollments with those badges are denied.
- When the cardholder no longer matches (field value changed or cleared, or rule edited), the credentials are removed from the opt-out list at the next synchronization and the cardholder can enroll again; a new profile is created.
- Several rules can be configured; a cardholder matching any rule is opted out. Removing a rule recomputes the list against the remaining rules.
User-defined Credential Types (per badge)
- Select one or more OnGuard badge types (e.g., a temporary badge type). Badges of a selected type function normally while active.
- When a badge of a selected type passes its OnGuard Deactivate date/time, it is removed from the profile and added to the opt-out list within approximately two minutes. Badges of other types become inactive on expiry and are not opted out.
- The rule applies only to cardholders with an enrolled profile. A selected-type badge that is already expired at enrollment is ignored (neither linked to the profile nor added to the opt-out list).
- Activate/Deactivate is evaluated in the OnGuard server's local time; the OnGuard and Alcatraz Platform server clocks must be synchronized.
Removing entries
- While Bio Opt-out Credentials is enabled, rule-added entries cannot be deleted manually; the opt-out list is managed by OnGuard.
- Deleting the badge from the cardholder in OnGuard removes it from the opt-out list. Removing a badge type from the rules does not remove badges that are already opted out.
- Entries remain in the opt-out list, and continue to block enrollment, after the feature or the ACS Integration is disabled, until they are deleted manually. To remove them: uncheck Bio Opt-out Credentials (or disable the ACS Integration), click Save, then delete the entries. Disable the feature before deleting; otherwise the next synchronization re-creates them.
OnGuard configuration (User-defined Variables). In FormsDesigner, add a drop-down (list) field to the Cardholder form, define its list values (e.g., Enroll / Unenroll), and save; OnGuard creates the backing field automatically. Note the field's backend name (e.g., EZENTRY_PREF) and the exact value text — these are what you enter in the rule (backend name in Name, value text in Value). Grant the Alcatraz user view permission on the field.
Interaction with Disable Data Deletion. Bio Opt-out rules take precedence over Disable Data Deletion. With Disable Data Deletion enabled, an expiring selected-type badge cannot be removed from its profile; the entire profile is therefore deleted immediately, including active badges, and the expired badge is added to the opt-out list. This behavior is by design.
Verifying. After enabling a User-defined Variable rule, run a Full Sync and confirm that the ACS Integration log contains both Full sync completed successfully and Opt-out credentials synced; the first message alone indicates that the rule is not active. Credential-type rules add entries on badge expiry only, logged as Opt-out badge was added with the card number and facility code.
Note: OpenAccess refreshes its user-defined field definitions every 5 minutes. A field created or renamed in FormsDesigner may take up to 5 minutes to become available to the integration.
4. Installing Alcatraz Proxy Service (Cloud Deployments)
Alcatraz Proxy Service opens a connection between the Alcatraz Platform and OnGuard when the two are running in separate networks. Install it on a Windows Server that can reach the OnGuard OpenAccess service directly over the network – usually on your own network, often on the OnGuard server itself. The Proxy connects locally to OpenAccess (TCP 8080, or your custom OpenAccess port) and opens a single outbound-only TLS connection to your region's Alcatraz cloud endpoint (US or EU) on TCP 3033, authenticated with your PEM certificate. No inbound firewall ports are required.
Alcatraz Proxy Service is required in the following cases:
- You are an Alcatraz Enterprise Cloud user.
- Your Alcatraz Platform runs on-premises, but it cannot reach the OnGuard OpenAccess server over the network (the two are in separate networks).
- In the ACS Integration settings, check Advanced Settings → Use Proxy.
- Click Download under Certificate in PEM format and save the file.
- Install the Proxy Service on a Windows Server with visibility to the OpenAccess service – follow Installing Alcatraz Proxy Service for OS requirements and installer steps.
- During installation, enter your region's (US/EU) Alcatraz cloud endpoint on port 3033 (endpoints are listed in the install guide).
5. Map OnGuard Readers to Rocks
- In the Admin Portal, go to Device Management → Readers.
- Click Add Reader, enter part of the reader name as it appears in OnGuard, select the reader, and map it to the Rock.
- Reader assignments can also be set from each Rock's device configuration page (Device Management → Devices → select the Rock → Settings → Modify → Reader) or, for a pending device, from Settings → Authenticate.
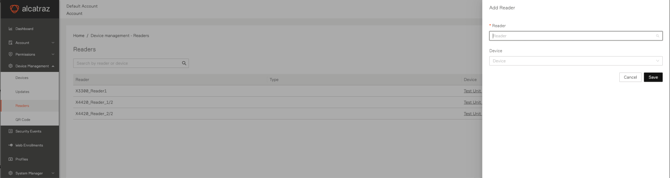
Device Management → Readers → Add Reader.
Note: After mapping a reader to a newly added Rock, run a Full Sync so existing profiles receive access on the new device. Until a synchronization completes, enrolled users may not be able to authenticate at the new Rock.
Note: Profiles are distributed only to Rocks whose mapped reader is included in an access level assigned to one of the cardholder's active badges. A Rock mapped to a reader that is not part of any access level receives no profiles.
6. Verifying the Integration
- (Proxy deployments only) Confirm the service is running: open Services (services.msc) and check that Alcatraz Proxy Service shows Running.
- In the Alcatraz Admin Portal, open Account. The status at the top of the page should show ACS Online within a few minutes.
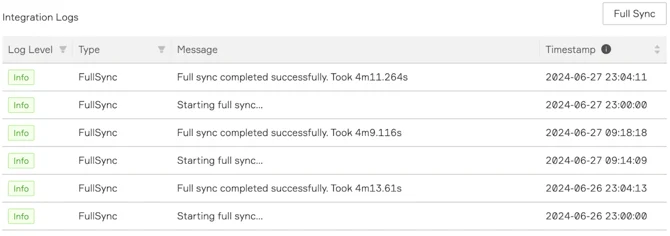
- Run a Full Sync and confirm entries appear in the ACS Integration logs, ending with Full sync completed successfully. The ACS Integration section includes the integration logs, a button to start a full synchronization, and an option to export the logs as a CSV file. With Advanced Logging enabled, the log lists every skipped credential and the reason.
- Open Device Management → Readers; the OnGuard readers should be listed.
- Enroll a test cardholder with an active badge whose access level includes a mapped reader. The profile should list the badge (and any other active badges of the cardholder) and be present on the corresponding Rock; facial authentication at that Rock should be granted.
- In OnGuard, set the test badge to Lost and then back to Active. The badge should be disabled and re-enabled in the profile within about a minute, without a full synchronization; this confirms that software events are delivered.
- (Send Security Events only) In OnGuard Alarm Monitoring, confirm Alcatraz events appear under the configured Logical Source.
Note: Proxy logs are stored under the Data Directory (default C:\ProgramData\Alcatraz AI\Proxy). OnGuard OpenAccess logs are stored in C:\ProgramData\Lnl\logs (OpenAccess.log, EventContextProviderService.log); verbose logging for LS OpenAccess can be enabled in the OnGuard Configuration Editor while troubleshooting.