Alcatraz Admin Portal allows you to configure Single Sign-on (SSO) using Azure as an Identity Provider (IdP) over the SAML 2.0 protocol.
Availability
SSO is available if you run Alcatraz Admin Portal using the following Alcatraz solutions:
-
Alcatraz Enterprise Cloud (single-tenant)
- On-premises
SSO is not available if you run the Alcatraz Cloud multi-tenant solution.
Acquiring Redirect URL from Alcatraz Admin Portal
As the first SSO setup step, go to Alcatraz Admin Portal and generate a Redirect URL that you will later use to set up your Microsoft Azure account.
The following Alcatraz Admin Portal roles can set up SSO:
- Account Administrator
Take these steps to generate a Redirect URL in Alcatraz Admin Portal:
- Log in to Alcatraz Admin Portal as a supported role.
- In the left menu, go to Account > Account Settings.
- Under Login Configuration, expand SSO Configuration.
- In Enable Alcatraz login with, click SSO with SAML 2.0.
- In Provider, select Other.
- In Metadata URL, enter a temporary URL like
https://.
You will enter the actual URL after you set up Microsoft Azure. - In Roles Mapping, map a dummy role:
- Click the plus sign next to Account Admin.
- In the text box that appears, enter a dummy group or role name,
tempfor example.
You will make the actual mapping after you set up Microsoft Azure.
- Leave the rest of the options unchanged.
- Click Submit.
The Redirect URL specific to your account or deployment appears in the Redirect URL box.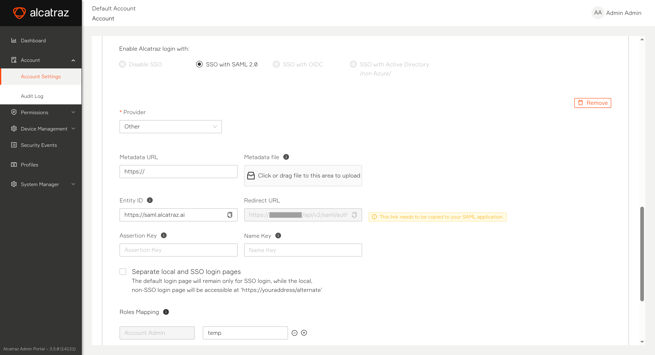
- Copy the Redirect URL and store it for later.
Setting Up Microsoft Azure for SAML SSO
The next step after acquiring the Redirect URL is to set up a Microsoft Azure application for your Alcatraz SSO integration.
Take the steps in the following subsections to create and set up an Azure application for an Alcatraz SSO integration.
Creating the Azure Application
Take these steps to create a Microsoft Azure application:
- Log in to your Microsoft Azure account.
- Click the Microsoft Entra ID service.
- In the left navigation, click Manage > Enterprise applications.
- Click New application.
- Click Create your own application and then do the following in the sidebar that appears:
- Enter a name for your Azure application.
Example:Alcatraz SSO - Click Integrate any other application you don't find in the gallery (Non-gallery).
- Click Create.
- Enter a name for your Azure application.
Setting up the Azure Application
Microsoft Azure can be set up in many different ways. Use the following steps as a guideline and then adapt them to your organization's needs and setup.
Take these steps to set up the Microsoft Azure application that you created:
- In the application's left navigation, click Manage > Single sign-on.
- Click SAML.
- In Basic SAML Configuration, click Edit, and do the following:
- Click Add identifier and type
https://saml.alcatraz.aias an identifier (entity ID). - Click Add reply URL and paste the Redirect URL that you acquired in Acquiring Redirect URL from Alcatraz Admin Portal.
- Under Sign on URL (Optional), type any URL like
https://localhost. - Click Save at the top of the sidebar.

- Click Add identifier and type
- In Attributes & Claims, click Edit and then do the following:
- Create a group claim:
- Click Add a group claim.
- For Which groups associated with the user should be returned in the claim?, select the option that matches your organization's needs.
For example, if you intend to limit the groups that can access this Azure application, click Groups assigned to the application. If unsure, click All groups. - In Source attribute, select the Entra ID attribute that contains the user's group list in your organization.
Example:Group IDorsAMAccountName. - Under Advanced options, check Customize the name of the group claim.
- In Name, type
group. - Leave the rest of the settings with their default values.
- Click Save.
- Optionally, create a display name claim:
This claim ensures that Azure will provide the user's Display Name to Alcatraz Admin Portal for displaying purposes. If the claim is missing, Alcatraz Admin Portal shows the user's email address instead.
- Click Add new claim.
- In Name, type a suitable name like
FullName.
Take a note of the claim name to use later when setting up Alcatraz Admin Portal. - For Source, select Attribute.
- For Source attribute, select
user.displaynameor the attribute that stores the user's full name. - Click Save.

- Create a group claim:
- Optionally, remove all other claims.
The Alcatraz SAML SSO integration does not take other claims into account. - Close the Attributes & Claims settings.
- In the SAML Certificates section, copy the App Federation Metadata Url value and store it for later.
Alternatively, download the Federation Metadata XML, which carries the same data but requires the extra steps of downloading it and then uploading it into Alcatraz Admin Portal.
Finalizing SSO Setup in Alcatraz Admin Portal
After setting up your Microsoft Azure application, you need to go back to Alcatraz Admin Portal and complete the SSO login setup using data from the Azure application.
Take these steps to complete the SSO login setup in Alcatraz Admin Portal:
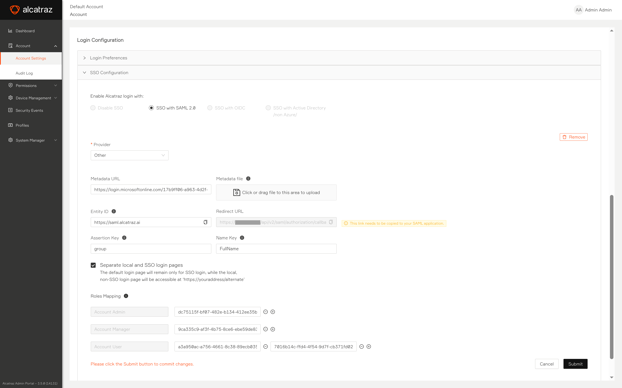
- Go back to Account > Account Settings and continue your SSO with SAML 2.0/Other configuration.
- In Metadata URL, replace the temporary URL with the App Federation Metadata Url URL that Azure generated for you.
Alternatively, upload the Federation Metadata XML in Metadata file if you prefer using the downloaded file. - In Entity ID, enter
https://saml.alcatraz.ai.
This value must match the Identifier (Entity ID) value in your Azure application. - In Assertion Key, enter the name of the group claim that you created in your Azure application (
group). - In Name Key, enter the name of the display name claim that you created in your Azure application.
Alcatraz Admin Portal looks for theFullNameclaim name if you leave this field empty. If the claim is missing from the IdP, Alcatraz Admin Portal shows the user's email address instead. - With Separate local and SSO login pages, do the following:
- Uncheck the box if you want to include an Alternate Log in link on the SSO login page that sends to the non-SSO login page. The non-SSO login page allows you to log in with user accounts managed by Alcatraz Admin Portal.
- Check the box if you want only the SSO login option to appear on the default Alcatraz Admin Portal login page.
In both cases, user accounts managed by Alcatraz Admin Portal can log in after visitinghttps://<alcatraz-admin-portal-url>/alternate` where<alcatraz-admin-portal-url>is the base URL of your Alcatraz Admin Portal instance.
- In Roles Mapping, map at least one role.
The mapping determines the Alcatraz Admin Portal role that Azure users receive upon logging in with SSO.- Click the plus sign next to the Alcatraz Admin Portal role.
- In the text box that appears, enter the Azure group identifier.
Depending on your Azure setup, the identifier is either the Azure group name (ex: Technical Documentation) or the Azure group Object ID (ex: dc75115f-bf07-482e-b134-412ee35bd8cc). If unsure, try each until you achieve a working integration.You can map multiple Azure groups to a single Alcatraz Admin Portal role. Click the plus sign again to add another text field.
- Click Submit.
Role Mapping Considerations
Keep the following in mind when mapping Alcatraz Admin Portal roles to Microsoft Azure groups:
- If you update the role mapping, the changes come into effect immediately, including for SSO users who are in the middle of a session.
- If you map a single Azure group to multiple Alcatraz Admin Portal roles, the group's members receive the highest-privileged role.
- Members of Azure groups that have access to the Azure application but are not mapped to an Alcatraz Admin Portal role receive the
Account User(least-privileged) Alcatraz Admin Portal role upon logging in.
Stopping the SSO Integration
Stopping the SSO integration deletes the SSO provider's setting from Alcatraz Admin Portal and returns to only using the user accounts managed by Alcatraz Admin Portal.
SSO users who were logged in at this time will remain logged in until their sessions expire.
The following Alcatraz Admin Portal roles can stop SSO:
- Account Administrator
Take these steps to stop using SSO login:
- Log in to Alcatraz Admin Portal as a supported role.
- In the left menu, go to Account > Account Settings.
- Under Login Configuration, expand the SSO Configuration.
- Next to Provider, click Remove.
- In the dialog box that opens, click OK to confirm the removal.
Troubleshooting
Azure SSO login fails with an error after entering credentials
Symptom
SSO login fails for a user or all users with "AADSTS50105: Your administrator has configured the application `<Application Name>` (`'<Application ID>'`) to block users unless they are specifically granted (‘assigned’) access to the application."
Possible Cause
Failure to login could be a symptom of an unassigned Microsoft Azure application.
Suggested Solution
Do either of the following, depending on your preferences:
- In the application's left navigation, click Manage > Properties and set Assignment required? to No. This action allows all your Microsoft Entra ID users to log in through this application.
- Leave Assignment required? set to Yes, but then go to Manage > Users and groups and add the users or groups to be allowed to log in to the Alcatraz application.
Email address appears instead of username
Symptom
Alcatraz Admin Portal shows email address instead of full name for SSO users
Possible Cause
Alcatraz Admin Portal expects a claim mapped to the IdP directory attribute that stores the user's full name. If the claim is missing, Alcatraz Admin Portal replaces the missing full name with the user's email address.
Suggested Solution
Create the claim as described in Setting up the Azure Application.
SSO user can log in but their Alcatraz Admin Portal role is wrong
Symptom
After logging in, the SSO user sees a restricted set of menus and settings.
Possible Cause
The role mapping is incorrect and the SSO user has been granted the least-privileged role because of that.
Suggested Solution
First verify that you have mapped the Azure group that the user is a member of. Members of unmapped groups receive the least-privileged role.
Then ensure that you use the correct identifier for your Azure setup when entering the Microsoft Azure group identifier. If the user doesn't receive the correct role when you supply the group name, try with the group's Object ID (ex:
dc75115f-bf07-482e-b134-412ee35bd8cc) and the other way around.